Invoke one Microservices from another - PART 3: Propagate Authentication
In this guide, you will learn HOW-TO propagate user authentication and authorization data between two microservices;
Prerequisites
To complete this guide, you need:
Introduction
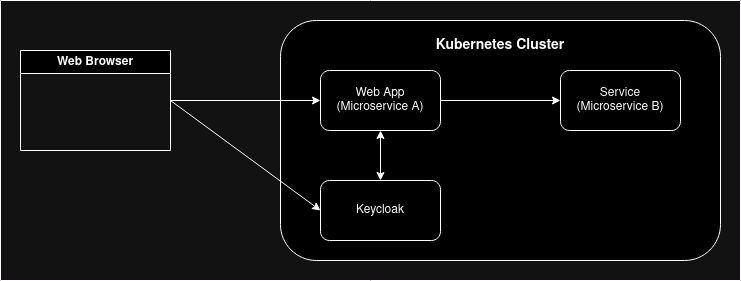
The scenario consists of:
-
a Service deployed on a Kubernetes cluster which is not exposed outside the cluster
-
a Web Application deployed on a Kubernetes cluster which is exposed outside the cluster and consumes the Service
The user is required to authenticate before using the Web Application and, after authentication happens, we want authentication data to be available, not only to the Web Application, but also tho the Service; authentication is delegated to Keycloak using OpenID Connect protocol;
The overall architecture is:
We will start from the two microservices we built in Invoke one Microservices from another - PART 2: Kubernetes and:
-
Microservice A will be the basis for Web Application
-
Microservice B will be the basis for Service
How it works
This is how it works:
-
The user tries to access Web Application (Microservice A) from a web browser
-
The browser is redirected to Keycloak where, by providing username and password, the user authenticates itself
-
The browser is redirected back to Web Application: this time the request contains a JWT Access Token (and a few more tokens actually) provided by Keycloak, containing authentication and authorization data
-
Web Application validates the JWT Access Token and grants access to the user
-
Web Application invokes Service (Microservice B) forwarding to it the JWT Access Token it just received
-
Service validates the JWT Access Token and grants access to Web Application
Keycloak
First, we install and configure Keycloak with users, groups etc..
Run Keycloak on Kubernetes
Create a folder named keycloak wherever you want;
Download file keycloak-realm-realm.json inside the keycloak folder you just created;
Then, create a configmap using it as its content (run the command from the keycloak folder):
kubectl create configmap keycloak-data-import --from-file=keycloak-realm-realm.json=keycloak-realm-realm.jsonCreate a file named keycloak.yaml in the keycloak folder:
apiVersion: v1
kind: Service
metadata:
  name: keycloak-external
  labels:
    app: keycloak
spec:
  ports:
    - name: http
      port: 8080
      targetPort: 8080
  selector:
    app: keycloak
  type: NodePort
---
apiVersion: v1
kind: Service
metadata:
  name: keycloak-internal
  labels:
    app: keycloak
spec:
  ports:
    - name: http
      port: 8080
      targetPort: 8080
  selector:
    app: keycloak
  type: ClusterIP
---
apiVersion: apps/v1
kind: Deployment
metadata:
  name: keycloak
  labels:
    app: keycloak
spec:
  replicas: 1
  selector:
    matchLabels:
      app: keycloak
  template:
    metadata:
      labels:
        app: keycloak
    spec:
      volumes:
        - name: keycloak-data-import-volume
          configMap:
            name: keycloak-data-import
      containers:
        - name: keycloak
          image: quay.io/keycloak/keycloak:26.0
          args: [ "start-dev", "--import-realm" ]
          env:
            - name: KEYCLOAK_ADMIN
              value: "admin"
            - name: KEYCLOAK_ADMIN_PASSWORD
              value: "admin"
          ports:
            - name: http
              containerPort: 8080
          readinessProbe:
            httpGet:
              path: /realms/master
              port: 8080
          volumeMounts:
            - name: keycloak-data-import-volume
              mountPath: /opt/keycloak/data/import
Deploy to your Kubernetes Cluster (run the command from the keycloak folder):
kubectl apply -f keycloak.yamlTo access the Keycloak console, find out on what IP address/port, minikube is exposing your keycloak-external service:
$ minikube service keycloak-external --url
http://192.168.39.190:31950
Open the link in your web browser and login to Keycloak with username/password "admin/admin";
|
Note
|
since we are using minikube, we expose Keycloak outside the cluster with a NodePort service (keycloak-external) and inside the cluster with a ClusterIP service (keycloak-internal)
|
optional alternative: configure Keycloak manually
As an alternative to using Keycloak auto import feature (see the "--import-realm" command argument above), you can configure Keycloak manually: remove volumes and volumeMounts and follow these steps:
-
Create a realm called keycloak-realm
-
Create a client called simple-microservice-client-secured; in the Capability config, turn on Client authentication.
-
For the simple-microservice-client-secured client, we also need to set the valid redirect URIs to * and set the Web origins to + to permit all origins of Valid Redirect URIs.
-
For the simple-microservice-client-secured client, note down the Client Secret in the Credentials tab (e.g.
KqIQIzNHD9LnCRjsCxblDnfEl4rcNoKB); -
Now, click on Realm roles and create two roles, user and admin.
-
Create a user called alice and assign her the user and admin roles; set password 123 for alice
-
Create a user called bob and assign him only the user role; set password 123 for bob
|
Note
|
in case you want to go deeper, find more information and examples in Setting up your Keycloak OpenID provider |
Web Application (Microservice A)
Maven Project
Copy simple-microservice-client into a new folder named simple-microservice-client-secured;
pom.xml
Update the artifactId to <artifactId>simple-microservice-client-secured</artifactId>;
Add the following to dependencies:
        <dependency>
            <groupId>org.wildfly.security</groupId>
            <artifactId>wildfly-elytron-http-oidc</artifactId>
            <scope>provided</scope>
        </dependency>
        <dependency>
            <groupId>jakarta.servlet</groupId>
            <artifactId>jakarta.servlet-api</artifactId>
            <scope>provided</scope>
        </dependency>
Add the following layers in the wildfly-maven-plugin:
<layer>elytron-oidc-client</layer>web.xml
Create file src/main/webapp/WEB-INF/web.xml with the following content:
<?xml version="1.0" encoding="UTF-8"?>

<web-app version="2.5" xmlns="http://java.sun.com/xml/ns/javaee"
         xmlns:xsi="http://www.w3.org/2001/XMLSchema-instance"
         xsi:schemaLocation="http://java.sun.com/xml/ns/javaee http://java.sun.com/xml/ns/javaee/web-app_2_5.xsd"
         metadata-complete="false">
    <security-constraint>
        <web-resource-collection>
            <web-resource-name>secured</web-resource-name>
            <url-pattern>/*</url-pattern>
        </web-resource-collection>
        <auth-constraint>
            <role-name>user</role-name>
            <role-name>admin</role-name>
        </auth-constraint>
    </security-constraint>

    <login-config>
        <auth-method>OIDC</auth-method>
    </login-config>

    <security-role>
        <role-name>user</role-name>
    </security-role>
    <security-role>
        <role-name>admin</role-name>
    </security-role>
</web-app>
oidc.json
Create file src/main/webapp/WEB-INF/oidc.json with the following content:
{
  "client-id" : "simple-microservice-client-secured",
  "provider-url" : "${env.OIDC_PROVIDER_URL:http://localhost:8080}/realms/keycloak-realm",
  "ssl-required" : "EXTERNAL",
  "credentials" : {
    "secret" : "${env.OIDC_CLIENT_SECRET:KqIQIzNHD9LnCRjsCxblDnfEl4rcNoKB}"
  }
}
In case you followed the steps in optional alternative: configure Keycloak manually, replace KqIQIzNHD9LnCRjsCxblDnfEl4rcNoKB with the Client Secret you previously noted down;
Java code
GettingStartedEndpointClient
Add the following interface:
package org.wildfly.examples;

import jakarta.ws.rs.GET;
import jakarta.ws.rs.HeaderParam;
import jakarta.ws.rs.Path;
import jakarta.ws.rs.PathParam;
import jakarta.ws.rs.Produces;
import jakarta.ws.rs.core.MediaType;
import jakarta.ws.rs.core.Response;
import org.eclipse.microprofile.rest.client.annotation.RegisterClientHeaders;
import org.eclipse.microprofile.rest.client.inject.RegisterRestClient;

@RegisterClientHeaders
@RegisterRestClient(configKey="simple-microservice-server")
@Path("/hello")
public interface GettingStartedEndpointClient {
	@GET
	@Path("/{name}")
	@Produces(MediaType.TEXT_PLAIN)
	public Response sayHello(@HeaderParam("Authorization") String authorization, final @PathParam("name") String name);
}
GettingStartedEndpoint
Modify the class GettingStartedEndpoint as in the following:
package org.wildfly.examples;

import jakarta.inject.Inject;
import jakarta.servlet.http.HttpServletRequest;
import jakarta.ws.rs.GET;
import jakarta.ws.rs.Path;
import jakarta.ws.rs.PathParam;
import jakarta.ws.rs.Produces;
import jakarta.ws.rs.core.Context;
import jakarta.ws.rs.core.MediaType;
import jakarta.ws.rs.core.Response;
import org.eclipse.microprofile.rest.client.inject.RestClient;
import org.wildfly.security.http.oidc.OidcSecurityContext;

import java.io.IOException;

@Path("/")
public class GettingStartedEndpoint {

    @Context
    private HttpServletRequest httpServletRequest;

    @Inject
    @RestClient
    private GettingStartedEndpointClient client;

    @GET
    @Path("/{name}")
    @Produces(MediaType.TEXT_PLAIN)
    public Response sayHello(final @PathParam("name") String name) throws IOException {
        Response response;
        OidcSecurityContext oidcSecurityContext = getOidcSecurityContext(httpServletRequest);
        if (oidcSecurityContext != null) {
            String authzHeaderValue = "Bearer " + oidcSecurityContext.getTokenString();
            System.out.println("\n\n[JWT] service Token: " + authzHeaderValue + "\n\n");
            return client.sayHello(authzHeaderValue, name);
        } else {
            System.out.println("\n\n[JWT] No token :(\n\n");
            return client.sayHello(null, name);
        }
    }

    private OidcSecurityContext getOidcSecurityContext(HttpServletRequest req) {
        return (OidcSecurityContext) req.getAttribute(OidcSecurityContext.class.getName());
    }
}
Build and push the image to Quay.io
Build the application:
mvn clean packageBuild the Docker image:
podman build -t simple-microservice-client-secured:latest .|
Note
|
You can use wildfly-maven-plugin to automate the image build
|
Create a public repository named simple-microservice-client-secured on quay.io (e.g. https://quay.io/repository/tborgato/simple-microservice-client-secured).
|
Note
|
replace tborgato with the name of your account in all the commands that will follow
|
Tag the Docker image:
podman tag simple-microservice-client-secured quay.io/tborgato/simple-microservice-client-securedPush the simple-microservice-client-secured Docker Image:
podman push quay.io/tborgato/simple-microservice-client-securedDeploy to Kubernetes
Create file simple-microservice-client-secured-deployment.yaml in the kubernetes folder in the root of your project:
apiVersion: apps/v1
kind: Deployment
metadata:
  name: simple-microservice-client-secured-deployment
  labels:
    app: simple-microservice-client-secured
spec:
  replicas: 1
  selector:
    matchLabels:
      app: simple-microservice-client-secured
  template:
    metadata:
      labels:
        app: simple-microservice-client-secured
    spec:
      containers:
        - name: simple-microservice-client-secured
          image: quay.io/tborgato/simple-microservice-client-secured
          ports:
            - containerPort: 8080
            - containerPort: 9990
          livenessProbe:
            httpGet:
              path: /health/live
              port: 9990
          readinessProbe:
            httpGet:
              path: /health/ready
              port: 9990
          startupProbe:
            httpGet:
              path: /health/started
              port: 9990
          env:
            - name: SIMPLE-MICROSERVICE-SERVER_MP_REST_URI
              value: "http://simple-microservice-server-secured-service:8080"
            - name: OIDC_PROVIDER_URL
              # replace with the outcome of "minikube service keycloak-external --url"
              value: "http://192.168.39.190:31950"
            - name: OIDC_CLIENT_SECRET
              value: "KqIQIzNHD9LnCRjsCxblDnfEl4rcNoKB"
Then:
-
replace "http://192.168.39.190:31950" with the outcome of command
minikube service keycloak-external --url(this is where your web browser will be redirected for authentication) -
replace "tborgato" with your account name on quay.io
-
In case you followed the steps in optional alternative: configure Keycloak manually, replace
KqIQIzNHD9LnCRjsCxblDnfEl4rcNoKBwith the Client Secret you previously noted down;
Deploy to your Kubernetes Cluster:
kubectl apply -f kubernetes/simple-microservice-client-secured-deployment.yamlCreate file simple-microservice-client-secured-service.yaml in the kubernetes folder:
apiVersion: v1
kind: Service
metadata:
  name: simple-microservice-client-secured-service
  labels:
    app: simple-microservice-client-secured
spec:
  ports:
    - name: http
      protocol: TCP
      port: 8080
      targetPort: 8080
  selector:
    app: simple-microservice-client-secured
  type: NodePort
Deploy to your Kubernetes Cluster:
kubectl apply -f kubernetes/simple-microservice-client-secured-service.yamlService (Microservice B)
Maven Project
Copy simple-microservice-server into a new folder named simple-microservice-server-secured;
pom.xml
Update the artifactId to <artifactId>simple-microservice-server-secured</artifactId>;
Add the following to dependencyManagement:
<dependency>
    <groupId>org.wildfly.bom</groupId>
    <artifactId>wildfly-expansion</artifactId>
    <version>${version.wildfly.bom}</version>
    <type>pom</type>
    <scope>import</scope>
</dependency>
Add the following to dependencies:
        <dependency>
            <groupId>org.eclipse.microprofile.config</groupId>
            <artifactId>microprofile-config-api</artifactId>
            <scope>provided</scope>
        </dependency>
        <dependency>
            <groupId>org.eclipse.microprofile.jwt</groupId>
            <artifactId>microprofile-jwt-auth-api</artifactId>
            <scope>provided</scope>
        </dependency>
Add the following layers in the wildfly-maven-plugin:
        <layer>microprofile-config</layer>
        <layer>microprofile-jwt</layer>
microprofile-config.properties
Add file src/main/resources/META-INF/microprofile-config.properties with the following content:
mp.jwt.verify.publickey.location=http://localhost:8080/realms/keycloak-realm/protocol/openid-connect/certsJava code
GettingStartedApplication
Modify the class GettingStartedApplication as in the following:
package org.wildfly.examples;

import jakarta.ws.rs.ApplicationPath;
import jakarta.ws.rs.core.Application;
import org.eclipse.microprofile.auth.LoginConfig;

@LoginConfig(authMethod="MP-JWT")
@ApplicationPath("/hello")
public class GettingStartedApplication extends Application {

}
GettingStartedEndpoint
Modify the class GettingStartedEndpoint as in the following:
package org.wildfly.examples;

import jakarta.annotation.security.RolesAllowed;
import jakarta.inject.Inject;
import jakarta.ws.rs.GET;
import jakarta.ws.rs.Path;
import jakarta.ws.rs.PathParam;
import jakarta.ws.rs.Produces;
import jakarta.ws.rs.core.MediaType;
import jakarta.ws.rs.core.Response;
import org.eclipse.microprofile.config.inject.ConfigProperty;
import org.eclipse.microprofile.jwt.JsonWebToken;

@Path("/")
public class GettingStartedEndpoint {

	@Inject
	@ConfigProperty(name = "mp.jwt.verify.publickey.location")
	private String publicKeyLocation;

	@Inject
	JsonWebToken jwt;

	@GET
	@Path("/{name}")
	@Produces(MediaType.TEXT_PLAIN)
	@RolesAllowed({"admin"})
	public Response sayHello(final @PathParam("name") String name) {
		System.out.println("mp.jwt.verify.publickey.location=" + publicKeyLocation);

		String response =
				"Hello " + name
						+ (jwt != null ? (" Subject:" + jwt.getSubject()) : null)
						+ (jwt != null ? (" Issuer: " + jwt.getIssuer()) : null);

		return Response.ok(response).build();
	}
}
Build and push the image to Quay.io
Build the application:
mvn clean packageBuild the Docker image:
podman build -t simple-microservice-server-secured:latest .Create a public repository named simple-microservice-server-secured on quay.io (e.g. https://quay.io/repository/tborgato/simple-microservice-server-secured).
|
Note
|
replace tborgato with the name of your account in all the commands that will follow
|
Tag the Docker image:
podman tag simple-microservice-server-secured quay.io/tborgato/simple-microservice-server-securedPush the simple-microservice-server-secured Docker Image:
podman push quay.io/tborgato/simple-microservice-server-securedDeploy to Kubernetes
Create file simple-microservice-server-secured-deployment.yaml in the kubernetes folder:
apiVersion: apps/v1
kind: Deployment
metadata:
  name: simple-microservice-server-secured-deployment
  labels:
    app: simple-microservice-server-secured
spec:
  replicas: 1
  selector:
    matchLabels:
      app: simple-microservice-server-secured
  template:
    metadata:
      labels:
        app: simple-microservice-server-secured
    spec:
      containers:
        - name: simple-microservice-server-secured
          image: quay.io/tborgato/simple-microservice-server-secured
          ports:
            - containerPort: 8080
            - containerPort: 9990
          livenessProbe:
            httpGet:
              path: /health/live
              port: 9990
          readinessProbe:
            httpGet:
              path: /health/ready
              port: 9990
          startupProbe:
            httpGet:
              path: /health/started
              port: 9990
          env:
            - name: MP_JWT_VERIFY_PUBLICKEY_LOCATION
              value: "http://keycloak-internal:8080/realms/keycloak-realm/protocol/openid-connect/certs"
Then:
-
replace "tborgato" with your account name on quay.io
Deploy to your Kubernetes Cluster:
kubectl apply -f kubernetes/simple-microservice-server-secured-deployment.yamlCreate file simple-microservice-server-secured-service.yaml in the kubernetes folder:
apiVersion: v1
kind: Service
metadata:
  name: simple-microservice-server-secured-service
  labels:
    app: simple-microservice-server-secured
spec:
  ports:
    - name: http
      protocol: TCP
      port: 8080
      targetPort: 8080
  selector:
    app: simple-microservice-server-secured
  type: ClusterIP
Deploy to your Kubernetes Cluster:
kubectl apply -f kubernetes/simple-microservice-server-secured-service.yamlTest
$ minikube service simple-microservice-client-secured-service --url
http://192.168.39.190:32225
Open that URL in your browser, log in as alice/123 and try it out!
After pressing the "Say Hello" button, you should see something like:
Hello ddd Subject:aaef43ee-4005-4d2d-a5f0-0e0d11a1f831 Issuer: http://192.168.39.190:31950/realms/keycloak-realm